Wednesday, October 3, 2012

I Baked my Baby's First Birthday Cake!

I guess I'm the baking kind of mum. I love it :) I baked my baby girl's first Birthday cake. I knew I wanted a cake that would A) taste delicious and moist B) look elegant, girly and cute C) feed about 40 people. So I decided on a layered cake with classic chocolate and moist vanilla, with a light whipped cream filling. The frosting was something that had me thinking for a while. I wasn't sure if the whipped cream would hold in room temperature and since I was planning on making the cake the night before, I wanted something that would still look and taste as good on the morning of the party. I pondered over fondant, but somehow wasn't very keen on it. And then one morning as I woke up, the idea of a white chocolate ganache came to me, just like that :) Maybe because I always knew that I wanted  something white(ish) with a sprinkling of colour on it, or something. And I ended up making a (pretty) tall cake frosted with decadent white chocolate ganache and topped with Smarties in the colours of the party. I was rather happy with the result, although it did look very homemade, which I think is quite endearing :)

Ganache is not something difficult at all! I can say it quite confidently now. When I started looking for recipes on the Internet, I read a lot about how tricky it is, how it can go horribly wrong, etc. But I must admit, I found it actually very simple and foolproof. Either that or I was very lucky :) Here's how I made it -

I used -

  • 1 part heavy whipping cream
  • 3 parts white chocolate chips (roughly chopped so they melt quicker)
Method - 
  • Place chocolate chips in a large mixing bowl (preferably either stainless steel or a microwave safe one)
  • Heat cream in a saucepan on a low flame until you start seeing tiny bubbles around the edge.
  • Pour heated cream over the pulsed chocolate chips and let sit for a minute or so.
  • Using a spatula, gently stir in everything, until the chocolate and cream turn into a smooth paste. It will be quite runny at this stage. If you feel the cream wasn't hot enough to melt all the chocolate, stick the (microwave safe) bowl into the microwave for about 30 seconds. Be careful not to burn the chocolate.
  • Once you're happy with the mixture and there are no lumps, leave it (preferably uncovered) on the counter to cool down completely.
  • Now you need to wait for this ganache to 'set' to a nice, soft spreadable consistency. If the room is cool enough, you could leave it out on the counter overnight. If not, simply cover with cling wrap and pop it into the fridge.
  • When you're ready to frost your cake next morning, take ganache out of the fridge and reheat in the microwave in short 30-second bursts until the desired spreadable consistency is achieved.
  • Frost away!
This mixture holds well and I did not have any problems with it considering the frosted cake was left on the table all day! You could even store remaining ganache in an airtight container to use later.

If you want to make a dark chocolate ganache, it's 1 part heavy cream to 2 parts dark/semi-dark chocolate. The procedure is the same.

Oh another thing I saw on the Internet, if you're using  heavy whipping cream, like I did, you could even whip the ganache just before frosting for an even lighter and creamier texture. I didn't this time, but maybe will try it the next time.

I'm still very much an amateur when it comes to cake decorating and I had quite a hard time trying to get a smooth finish on my cake and getting the sides 'straight'. I tried for a bit, but then decided I was quite happy with my homemade look :) The cake tasted good and that's all that mattered, well, to me!

Monday, September 10, 2012

Rain Gods, bring it on! We're sufficiently armed!

This post is way too late, the rains have gone, the cold winds have stopped and it's now beautiful spring time here in Aussie! But I still want to post this classic, quintessential Indian Monsoon snack.

Pakoras!

The easiest, most sought after snack when dark clouds loom over the skies. And as the first faint pitter-patter of the raindrops begins, there's frantic running to fetch the washing hanging on the clothesline out in the backyard (or terrace). Someone puts a saucepan full of water on the stove and starts crushing fresh ginger and elaichi to make steaming cups of chai. Meanwhile, onions are finely chopped and tossed into a bowl with besan, salt, chilli powder and turmeric. Indoors is suddenly decked with half dried washing, almost like buntings! And when the chai and pakoras are ready, everyone finds a cozy little spot to sit, legs tucked under their bottoms. The rain outside and the warmth inside...aaah! The familiar sights and smells of 'home'!

Easy and satisfying Crispy Onion Pakoras

  • 2 large onions, finely chopped
  • 1 cup besan (chickpea flour)
  • 1/2 teaspoon red chilli powder
  • 1/4 teaspoon turmeric powder
  • salt to taste
  • oil for deep frying
  1. Toss into a large bowl chopped onions, red chilli powder, turmeric and salt.
  2. Use your hands to mix everything well. Leave aside for about 5 minutes.
  3. The onions will start to release some water when combined with salt. Now add besan and again, mix well using your hands. Using your hands, instead of a spoon, will help you judge how much water you need to add in. The secret to crispy pakoras is a nice, stiff dough, not batter. Too much water and the pakoras will turn out soggy and limp. So simply sprinkle some water and continue to mix until the mixture holds itself together. Basically, you don't want any dry besan in the bowl and neither do you want a runny batter.
  4. Heat oil in a wok and when hot, drop in small portions of the onion-besan mixture and fry until golden brown and crispy.
  5. Serve hot with tomato ketchup and green chilli chutney.
We had a sudden bout of rain here in Sydney the other day. So it was the perfect setting :) Diet-shmiet! Everything flew out of the window when it was time for pakoras!

Saturday, August 11, 2012

Here I am!

So, yes, it's been like decades since I posted something here! What can I say? Still, to the point of sounding very cliched, I do have to say that too much has been happening in my life lately. For starters, we had our baby, then got totally into the 'what-just-happened' phase where everything was so overwhelming! Then when I slowly started getting it, we moved house. Then there was more of that overwhelming feeling with at least a few dozens of cartons waiting to be opened and things inside to be put away, all while managing to maintain the routine that we had painstakingly set up for our Little Miss. Phew! Talk about growing up, it kind of suddenly happened in our lives I guess :)

In the midst of all this, I still cooked. And sometimes made some yummy, really nice things. But as usual, I did not take pictures and write down recipes. Like I had the energy and patience, didn't I just finish whinging? And then slowly, the strong creative juices, bottled somewhere deep inside my soul, started oozing out to the surface and I did make it a point to take some impromptu pictures on my (new buddy) iPad. 'I'll blog about it later', I'd say to myself as I clicked a few pictures before things went on a plate and into our (waiting) tummies.

Here's something I made when we had friends over on a Saturday night - Black Forest Cake. I'd never thought I'd attempt to make it at home, something we always bought from a bakery for Birthdays and Anniversaries. But then I thought I'd try it myself when I saw how easy Madhura made it look. Actually, I had stocked my pantry with everything I needed and had planned to make it when a good friend had come to stay with us with her little darling kids. But sadly, the big baking project was doomed right at the beginning when the base chocolate cake gave way and cracked right in the middle as my heart let out an exasperated sigh. So we just salvaged the crumbly cake and ate it as is.

But the next time I was careful. I started by baking two round chocolate cakes, then carefully sliced them into two, so ended up with four layers of basic chocolate cake, waiting to be transformed into the much-loved Black Forest cake. You could make the chocolate cakes from scratch, but I cheated and used cake mix. If I can do it, so can you. Here are the other things you'll need -

  • Cherries in syrup (or fresh cherries and then some cherry liqueur, mmmm)
  • Thickened cream, the kind suitable for whipping
  • Icing sugar
  • A bar of chocolate
Once your layers are ready, drizzle a couple of tablespoons of cherry syrup all over them so they turn nice and juicy.
Next start assembling your cake, preferably on a cake pedestal.
Whip cream and icing sugar until fluffy and stiff enough to spread. The amount of cream and sugar is entirely up to you and depends on how much you want to slather on your cake (yum!). I used about 2 jars of 300mls thickened cream and about 3/4 cup icing sugar.
Now simply layer all the slices with a generous spread of whipped cream between each layer.
Once you put the last layer on top, cover the entire cake with whipped cream. Top with cherries and grated/shaved chocolate. You could go all over the cake, the sides and everything with grated chocolate, but I couldn't get how to do it without it looking messy. Then again, who cares right? Messy or perfect, chocolate and whipped cream? You could never go wrong :) As you see in my picture, I do need some serious cake decorating lessons :) But the cake? Oh-so-delicious! And the gooey feeling in your heart that it is home-baked is absolutely awesome! This turned out to be a rather tall cake with some really gigantic slices, but no one's complaining :)

Thursday, March 15, 2012

Classic, all-time favourite!

There are some dishes I can eat every day of my life, if I have to. Classics that never go off the 'favourites' list. One of them is this simple, really quick Balekai fry (sauteed cooking bananas, the green ones). An all time favourite and for me, best eaten with hot plain rice and ghee. Maybe some clear rasam (Indian lentil and tomato soup) as well...Just like it used to be at Amma's :)

Here's how I make it. Try it and chances are it'll creep into your 'favourites' list too, if it isn't already there :)

Get a couple of green cooking bananas. Pick fairly firm ones and avoid the ones that have a slight yellowish tinge to them (which means they're probably ripening). If you live in Aussie land, you can find them at most fresh fruit 'n' veggie stores or your local Indian store.
Then, wash and peel them. Try not to take off too much of the insides while you peel. Just lightly run your knife down the sides and get rid of the fibrous green skin.
Now slice each banana in half and then quarter. Next, slice into bite sized wedges, neither too thin nor thick. Make sure the pieces are somewhat similar sized to ensure even and fast cooking.
Then heat about a tablespoon of oil in a pan or wok (non-stick works really well). Once the oil is hot, add 1/2 a teaspoon of mustard seeds and let them crackle. Next add 1/4 teaspoon whole cumin, a pinch of hing (asafotieda) and a pinch of turmeric. Also add in some fresh curry leaves (yum!). 
Tip in the sliced banana and give it a good mix so that they are coated well with the tempering.
Saute, uncovered until the bananas are well cooked. Somewhere in between the cooking process, add salt and chilli powder to taste and mix well. You should be aiming for them to turn out sort of crispy, sort of tender, well cooked and well flavoured. This really shouldn't take very long, say about 10 - 15mins.
You could cover the pan to speed up the cooking process, but I don't like to do that as the whole dish tends to get a bit soggy.

Do make sure it is well cooked. Under cooked green bananas are notorious for not-so-pleasant tummy issues :)

This is a great dish to serve on the side if you're cooking a south Indian feast.
Enjoy!

Tuesday, March 13, 2012

Sweet Potato Fries (in the oven)

Hey there! Trust everyone's been cooking well and eating well :)
As you may already know, Pinterest.com can be a serious addiction! I may have to sign up for Pinterst-aholics Anonymous soon. (Of course, someone is bound to come up with that soon!) Meanwhile all is well at the inspiration land, so much to see, so much to admire and quite a bit to try as well. Like these super awesome sweet potato fries. KFC had them for a limited time and I was in love. And there was this one time we ate at a nice cafe-restaurant kind of place and we ordered their hand-cut sweet potato fries which were really delish. So it's small wonder that I tried them at home the same evening I saw it on Pinterest. Got to love Pinterest! They turned out so great! (Unfortunately, I don't have a record of the blog I found the recipe from).


It's super easy. All you have to do is get yourself a sweet potato (or two) and wash it thoroughly. You'll be leaving the skin on so it's important to clean it very well and get rid of any dirt on it. Then simply cut them into sort of chunky slices and place in a bowl. Drizzle a wee bit of olive oil all over it. In another little bowl, prepare your spice mix - now I used paprika, salt and cumin powder. You could use anything you like, although my spice mixture tasted really good in the end :-)


Now place the chips on an oven tray (you may want to line it with foil first) and put into a preheated oven at 180 deg. Leave to cook for about 20 minutes, but keep checking on them as oven temperatures and cooking times may vary. When you take them out after they're done, they should be kind of crispy, kind of soft, kind of sweet 'n' salty...mmmm, you get the idea!


We had ours with home-made pizza, yum!

Wednesday, February 1, 2012

An exciting medley of flavours!

Baby in bed - check
Movie to watch - check
Yummy dinner with minimum effort - check
That Friday night was a treat for us! 

It all began over coffee 'n' scone late that afternoon. Having just come back from India, husby and I were rambling about all the eating we had done there. Our (at least mine) taste buds hadn't yet accepted that the holiday was over, and the scone wasn't doing anything for me. I needed something tangy, something with that punch, you know? And husby was not willing to drive me all the way to Parramatta, 'just for a plate of chat', in his words. He tried reasoning it out, pointing out that the traffic would be mad that time of the day and most importantly the (tennis) match would begin at 7 something. Pah! Anyway, he did promise to take me there the next day though. But 'tomorrow' wasn't good enough for me, I wanted chat and that was it.
So then of course we stopped by at the Indian store, picked up a couple of things so I could make it all at home and headed back home with a happy and convinced husby. And that's how that Friday night was a treat :) I made bhel puri and papdi chat for dinner and we watched Nanban, while baby slept peacefully, oh bless her!

Not that it is a very elaborate procedure for me to actually blog about it...it's just a simple assembly once you have all the ingredients ready! Everything, you should be able to get easily at an Indian grocery store. Also, there is no set quantity/measurement or anything, just go by what you like. Easy peasy :) Here's what I used -

  • store bought papdi
  • store bought tamarind chutney (you could make your own)
  • store bought green chilly chutney
  • ok...so I'll stop saying 'store bought' :-)
  • fine sev
  • yogurt
  • finely chopped onion
  • finely chopped tomato
  • grated carrot
  • finely chopped fresh coriander
  • finely chopped cucumber (optional)
  • boiled and mashed potato
Method (like there is one, sheesh!)
  1. Take out your favourite plate (how big or small is up to you)
  2. Arrange (whole, undamaged) papdis in one layer, all over the plate
  3. Top with rest of the ingredients, starting with onion, boiled potatoes, carrot, tomato, some tamarind chutney, green chutney and yogurt. 
  4. Finally sprinkle chopped coriander and a generous amount of sev.
  5. Enjoy!
And the best part is, all the stuff you bought will last for at least a couple of more chat episodes :)

Wednesday, December 7, 2011

I found time to bake!

Hello hello! I'm still cooking, so I'm alive :-)
With Little Miss' arrival I have hardly been in the kitchen for more than 15 minutes at a stretch, during which I manage to cook some one pot wonder to keep the hard working husband (and myself) well fed.
So the other day I was mighty pleased with myself 'cause I baked this yummy fruit cake/bread. With Little Miss napping peacefully, I was surfing the Internet and generally looking at some recipe videos when I stumbled upon this. So easy! And I had all the ingredients at home, yay! So I baked it right away and when husby darling called out 'Honey, I'm home' that evening, I was super excited to serve him a nice big slice with some hot coffee. Of course, saving a couple of slices was quite a challenge as I'd already started gobbling up pieces of the hot bread, straight out of the oven! I say pieces because I had no patience to let it cool before I could make, how shall I say...civilised slices of it. So I just literally tore it off and popped the still hot pieces into my mouth. A serrated knife works best, by the way and wait it cools down before you slice it. If you want it to look pretty, that is. If you can't be bothered then just do what I did. I'm pretty sure you will :-) Okay, enough said. Here's the recipe. You don't really need to have a degree in aeronautical engineering or something to figure out that this recipe has five cups of something, duh! So here's what you need, a cup of each -
  1. self raising flour (I only had plain flour, so I just added 2 tspns of baking powder to it)
  2. sugar
  3. milk
  4. chopped fruits 'n' nuts (I used sultanas, cashews, almonds, walnuts and sunflower seeds)
  5. dessicated coconut
Actually, you only need about 1/2 a cup of sugar or so, but you know, '5 cups recipe' sounds too cute. I mean '4.5 cups fruit cake' would only sound silly :-)

So then, you sift the flour (and baking powder if you're using plain flour) into a large bowl and add all other ingredients. Mix well with a wooden spoon and pour the (rather thick) mixture into a loaf tin and bake in a preheated oven at 180deg (oven settings may vary) for about 40-45 minutes. That's it, really :-)

So go on, bake this super easy cake, cut a nice chunky slice for yourself, make a nice cuppa and sit back and enjoy! Ah, a blissful moment for me indeed!

Monday, May 30, 2011

I'm here!

Considering that I baked these cookies during Christmas last year, this post is long overdue...way too long! Well, what can I say? I've been so preoccupied lately that my dear little cooking blog has been totally neglected :(
I have been cooking though, more so now that I haven't blogged here for a while - what an irony! I wish I had had the patience and the enthusiasm to take pictures and journal all those recipes I tried and that turned out well. Well...I didn't, so nothing much I can do about it now. So I thought I'd slowly get back to blogging and decided to post about these cookies :)

Recipe Source: Nicko's Kitchen

  • 2 cups plain flour
  • 1/2 cup icing sugar
  • 200gms butter
  • icing sugar + water + food colour (as desired)
Simply mix the first three ingredients to form a soft dough. Roll out into medium thick sheets and cut into desired shapes.
Place on a cookie tray and bake in a preheated oven at 180 deg C for about 20mins (check to see they don't over bake and burn).
Have fun decorating them!


Tuesday, January 11, 2011

It's 2011!!

Hello there! 2011 is here and I don't have any new posts on my blog!! Appalling! I need to focus and manage my time better...
Anyway, hope the new year has started off well with all of you.
I will be back soon!

Saturday, December 25, 2010

Baked on Christmas

Christmas came and went on the calendar, but this quote sums up its true essence -

 "Christmas is forever, not for just one day,
for loving, sharing and giving are not to put away
like bells and lights and tinsel, in some box upon a shelf.
The good you do for others is good you do yourself."
-Norman Wesley Brooks

 I baked a very simple cake-mix vanilla sponge cake at teatime. I have never baked with a cake-mix before (yeah!) and I really liked the way the cake turned out. I simply followed the instructions on the packet and 45 minutes later pulled out a very light, spongy and perfectly risen cake from the oven. I'm sure it would've tasted just great as it was with tea. (the words 'selling like hot cakes' kept ringing in my head and I could imagine why!) But when I turned the cake tin over my wire rack, gently tapped the base and lifted the tin away, my heart did a little dance :) The cake was perfect! It easily slid off the tin, it had just the right amount of browning and was well baked. I had to make a topping of some kind, it was too hard to resist. I decided to keep it simple, so I skipped the rich creamy frosting. Instead, I just melted some white chocolate buttons (with a teeny bit of milk) in a saucepan over hot water and spread a thin layer of it over the cake. Then to the same sauce I added some drinking chocolate in order to get a darker shade of brown and drizzled it over the white. That's it! Delicious vanilla sponge cake with a simple white chocolate sauce.

I think I have learnt that the joy of cooking is doubled when the people you cook for enjoy eating. I find happiness in these simple pleasures of life :) I often say this, and couldn't mean it more - 'Good friends, good food, good times!'

Tuesday, December 21, 2010

A Snack in Need is a Snack Indeed!

Have you ever been bitten by the 'I-wanna-eat-something' bug? Well, it seems to like me, a lot! It specially loves to visit when I'm home alone and bored. That's when a whole lot of emotions and thoughts are running rampant in my head, like so - "I want a snack; but I don't want anything oily; Oh but I do!; No! Nothing oily; But something to munch on; But then I'm too lazy to make anything; Oh what can I eat; Darn! The munchies jar is empty; Now what?!"

One on such crazy afternoon, this great idea sprang to mind and I made besan pancakes (or so I'd like to call them). Quick, easy, not oily. Perfect for those notorious needy-clingy hunger pangs. The best part about this recipe is all the ingredients are at hand and it's made in a jiffy. I love such recipes because then I can prance about in my cozy little kitchen, pretending I'm on a cooking show and go about making my snack with the enthusiasm I started with. The joy of reaching out to just the right jars, measuring out everything, chopping, and preparing is something else! Otherwise my enthusiasm is generally dampened if it means I have to make a quick trip to the supermarket to get something I don't have. Since this recipe calls for just some basic stuff, it's a
favourite. See what I mean -
  • besan (chickpea flour) 1.5 cups
  • finely chopped tomato 1/4 cup
  • finely chopped onion 1/2 cup
  • 1 tbspn finely chopped coriander/cilantro
  • 1 tspn whole jeera (cumin)
  • 1 tspn paprika/chilli powder
  • 1/4 tspn turmeric powder optional
  • a pinch of hing (asafotieda) optional
  • a pinch of carom seeds (ajwain) optional - I generally add this to anything made of besan
  • salt to taste
Mix everything to make a (pouring) batter. Pour a big spoonful onto a heated skillet and spread evenly. Spray some oil and cook on both sides until done. Serve hot with some tangy pickle or maybe some tomato sauce.

Hate not those sudden cravings, instead make these besan pancakes and enjoy!

Wednesday, December 15, 2010

Who says you can't have street food at home?

Indian Street Food, if we were playing the word association game, by now there would be a really long list of associated words like chaat, pav bhaji, masala dosa, grilled sandwich, samosas, jalebis, vada pav, etc. etc. etc!! Oh those glorious streets of Bengalooru! The enticing aroma of spices, the hissing sound as a splash of water hits the hot grill, the crowd, the bustle, the lip smacking food, the experience. The bajjis never tasted as good anywhere except on the streets, the secret - oil that's used and reused (God knows how many times!). The samosa chaat is finger lickin' good, the secret - rustic bare fingers of the man who smashes the samosa in a quick blow. And the dosa, oh the dosa is divine, crisp yet spongy, the secret - a very hot griddle frequently splashed with a generous dose of oil and deftly spread with a stiff broom! Well, pardon my almost oxymoronic description. But I think that's entirely the essence of Indian Street Food, pure deliciousness amidst small 'eyebrow raisers' that can be easily ignored. I mean, come to think of it, we've been enjoying eating out for ages now and we've survived (!), so I guess we've kind of settled on the fact that reused oil, tap water and not the cleanest of kitchens can all be dismissed as 'not that big a deal'. But then again, maybe I can't generalise the conclusion. Maybe I speak only on behalf of my Indian counterparts who, by now, seemed to have developed a 'withstand-all' kind of a gene. Delhi Belly was coined for a reason, I'm sure! Nevertheless, if not in Bengalooru, then I'm sure some place else, most of us would know the true sense of an evening enjoyed gorging on street food.
Having said that, the effects of street food can be created at home as well. The same feeling of heightened senses as the spice hits just the right spots, the same medley of flavours and with some Bollywood numbers blasting from the iPod dock, voila! it's the street food experience right at home, and with clean water and washed hands :)

Bhelpuri - a (very) popular Indian street food item, tangy, sweet, crunchy and oh-so-yummy!

Ingredients - (will serve 2, 1 if you have a very strong craving)
(I haven't mentioned the quantity of some ingredients as it's totally up to your taste and liking. More if you love it, less if you don't so much)
  • puffed rice 2 cups
  • finely chopped onion
  • finely chopped cucumber
  • grated carrot
  • roughly diced boiled potato
  • finely chopped tomato
  • finely chopped fresh coriander/cilantro
  • a handful of roasted peanuts
  • a splash of lime juice
  • ready made papdi (available in Indian grocery stores), optional
  • salt, chaat masala powder (available in Indian grocery stores) and tamarind chutney (available in Indian grocery stores to taste
  • sev (available in Indian grocery stores) to garnish, optional
Method -
  • Simply combine everything, except puffed rice and sev, in a large mixing bowl.
  • Add puffed rice just before you're ready to serve and toss it well.
  • Garnish generously with sev and some extra chopped coriander and serve immediately.
Apparently, bhelpuri is considered a low fat snack, minus the papdi and sev. That's how I made it yesterday.

So hope you try this street food classic at your place and maybe it will inspire you to try it on the streets of India, if you haven't already!

Until then, cook, serve, love!

Monday, December 13, 2010

Mango Cupcakes

Hello! A quick little post to share a great recipe I found here.


I simply doubled the recipe as I wanted about a dozen of these :)

I've been spending some good time in my cozy little kitchen. I should take more pictures and post more often here. Sigh!

Monday, December 6, 2010

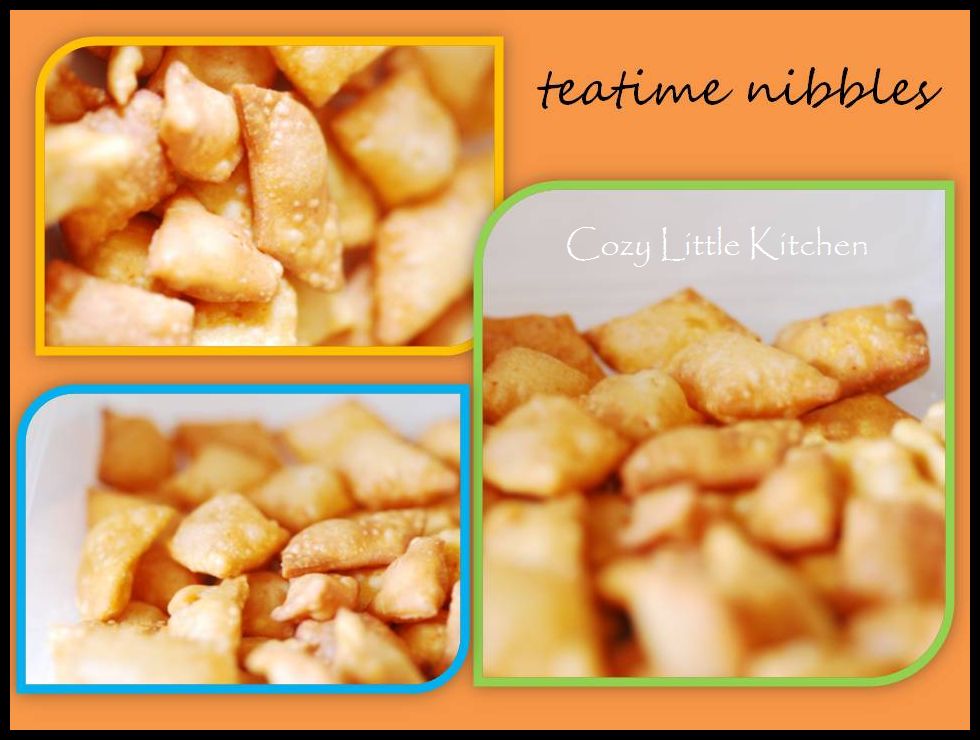
Teatime Nibbles

A strong cup of Indian masala chai (or south Indian filter kaapi) is somewhat incomplete without some snacks or nibbles on the side. Typically, it would be biscuits (Marie or Parle G) dunked and unceremoniously popped into the mouth in a hurry, lest the soggy bikkie disintegrates. I've had one too many dunking accidents and the resulting gooey sediment at the bottom of my teacup is not one of the most appealing things. So, bicuits with tea are more like a thing of the past for me. I digress. I was talking about the popular chai accompaniments. Samosas, pakodas or bajjis*, mixture* (what an innovative name, pah!), etc. are all popular teatime snacks. Basically, something deep fried and crisp (and oozing with fat that goes straight to the hips) is very gratifying at teatime.
On the list is a simple fried snack that my family calls 'thukudi'. I don't really know why it is called that! I think it is quite similar to what my north Indian friends call namakpare. Oh well, what's in a name? It's great for teatime, that's what matters, right? It's kind of like crisp, flaky puff pastry. It's a very simple recipe, yields a substantial quantity and keeps for a couple of weeks. Now that's my kind of recipe, a handy jar of crisp thukudi to perk up teatimes.
Here's the recipe -

1.5 cups wheat flour (or wholemeal, whatever you have at hand)
1/4 cup all purpose flour (you could skip this totally if you wish)
2 tbspns besan (chickpea flour)
salt and red chilli powder (or paprika) to taste
oil for deep frying
1 tbspn hot oil

Method -

  • Combine all the dry ingredients in a large mixing bowl.
  • Heat 1tbspn oil in a small skillet ( not to smoking point, just a little bit) and pour into the flour mixture.
  • Rub in the oil using your fingers until the mixture has the texture of breadcrumbs.
  • Using very little water gradually, work the mixture into a stiff dough.
  • Leave to rest for about 15mins.
  • Before you begin with the rested dough, pour oil in a wok or pot and place on medium heat.
  • Knead the dough on a work surface that's slightly dusted with flour and divide the dough into lemon sized balls.
  • Roll each ball of dough into a circle, slightly on the thinner side. But don't worry too much about it, 'cos if you try and roll it out too thin, it might get all clingy and stick to your work surface.The intention is to get crips nibbles and not soft  & soggy  (like mini pooris). So the thinner, the better.
  • Using a pizza cutter (or a knife) cut the rolled out dough into approx half inch strips. Then rotate about 40deg and cut into strips again, to get little diamond shapes.
  • Carefully tip in all the little dough diamonds into the hot oil (steer clear from tiny oil splashes in the process) and fry on both sides until crisp and light brown. Take care not to over fry them.
  • Drain onto a paper towel and store in an airtight jar.
  • You could even sprinkle a wee bit of chat masala powder when they're out of the oil and before they go into the jar.
I hope you enjoy these with your next cup of tea or coffee :)

*pakodas & bajjis: vegetable or onion fritters made with chickpea flour
*mixture: a medley of tiny deep fried (or toasted) nibbles (often sev & boondi, made from chickpea flour) and peanuts.

Monday, November 29, 2010

Strawberry Fields!

Okay, so it's been way too long since I yak-yakked here! I was just having a 'very-bored-yet-not-really-interested-to-do-anything' phase. And although I do feel like I'm getting out of it, a tiny bit of that vague feeling still lingers. So I thought I'd knock it off and give my bubbly, positive side a chance to do a come back. This post is one of my action points to do just that.

We're in Adelaide, South Australia, right now. The city of churches and the state with sprawling vineyards. We haven't really planned a wine tasting tour (yeah, that's right!) merely because we don't have the time for it. Husby darling is here on work and I'm just accompanying him, you know being the adorable little puppy who follows him everywhere (batting eyelashes). So no vineyards on our list, but definitely eating out a lot (since I'm determined not to cook this week), a trip (or two) to the Casino and lots of simply loitering around the city on our agenda :)


We did, however, drive down (up?) to this quaint little German settlement called Hahndorf just about 30mins from Adelaide city. It's a nice place, lots of shops to look at, sinful homemade fudge, bustling pubs serving German quintessentials and a general 'feel-good' factor. There's also the famous Beerenberg Farm a short walk up the main street.The main attraction there is strawberry picking and the range of jams, sauces and chutneys you can buy at their retail store. We thought we'd just 'have a look around' and wouldn't really pick any berries. But then there's something about the lush, fresh and very red strawberries that make you want to pick them! Rows & rows of little green shrubs with strawberries looking oh-so-pretty right there in the open, all natural, all beautiful! It's a lovely feeling, a hundred times better than when you spot a good punnet of firm ones at the supermarket. So we (rather I) ended up picking strawberries and looking pretty as husby darling took pictures :) It was 'well worth it', like the friendly lady at the store counter had said to us. We also bought a couple of jars of jams and sauces. It's hard to resist, especially when there's so much variety and they're so neatly stacked.


So now I have a big(gish) tray of fresh strawberries and I wish I had my cozy little kitchen here to bake something with them. But oh yeah, I'm determined not to cook this week, remember? So for now, I'll just be content with biting into a shiny, juicy strawberry, as is :)


There! It feels so good to do a rambling post after so long! Hope you enjoyed reading it as much as I did writing about it. And if you ever are in Adelaide, do the strawberry thing, it's well worth it!

Thursday, October 7, 2010

I call it 'Wedding Palya'!

Well, well...so here I am! Yes, I haven't disappeared from the face of the earth :) To tell you the truth, I have been so busy that I haven't had time to post. 'Pretty cliched and lame', you may say...but it IS true! The way I've been cooking for the past couple of weeks, I should probably be posting every single day! Oh the irony!


Anyways, so I thought I'd sign in and share this recipe with you. I had to share it. This is something that I talk about often but had never tried before. And today, I made it at home, just like that! Okay so now I better tell you what I'm talking about, right? It's what I call 'maduve palya' (literally translated: wedding steamed salad). no points for guessing why :) This kind of palya is typically served at weddings or other large gatherings where a traditional south Indian meal is served on a fresh plantain leaf. All you south Indians or more particularly from south Karnataka would probably know that this dish is generally made with suvarna gedde or suran or yam. I made it in my cozy little kitchen with kent pumpkin.

Here's the recipe -
  • 2 cups diced pumpkin
  • salt to taste
  • a pinch of turmeric
 For the spice paste -
  • 1/4 cup fresh coconut
  • 5-6 dry red chillies
  • 1/4 tspn black mustard seeds
  • a pinch of hing
  • a (very) small piece of jaggery/molasses
  • 1/4 tspn tamarind paste
For tempering -
  • 1/2 tspn oil
  • 1/4 tspn mustard seeds
  • 1/4 tspn urad dal
  • 1/4 tspn chana dal
  • a few curry leaves
Method -
  1. Microwave/steam the pumpkin with a pinch of turmeric. Try and keep the pieces firm (but cooked) and not very mushy.
  2. Make the spice paste with all ingredients mentioned. Use very little water. (all ingredients are to be ground just the way they are, no roasting required)
  3. Heat oil in a pan and add all ingredients for tempering, in the same order.
  4. Add cooked pumpkin, salt to taste and mix well.
  5. Put in the spice paste and mix well.
  6. Serve with hot rice and tomato rasam.
As I was cooking this, the subtle aroma brought back memories of the several gatherings we used to have back at home. The familiar sights, the sounds, the food! I think I'll do a post on wedding food soon :)

Till next time...cook, serve, eat, love!

Monday, September 20, 2010

Baking @ Home

Baking is so much fun!


Benne Biscuit or Butter Cookies - based on a couple of recipes I found on the internet.

 Masala Bun. Recipe here.

Will be back soon with more!

Wednesday, September 1, 2010

Quick Little Celebration

Husby darling passed the driving test at one go, yippeee! That called for a sweet reward :) So Kalakand was quickly made and quickly devoured. So easy, so quick, so divine! Enough said...sorry I don't have great pics, so that should tell you how patient we were after it was made! I found the recipe at Showmethecurry.com, a fun and fab place for great recipes.


I think you should definitely try this. I mean, with only two ingredients and very little effort, every day can be a celebration, what say? *wink*

Tuesday, August 31, 2010

Powerpacked One-Pot Dish

Bisibelebath, a word too familiar with true Bangaloreans :) A wholesome one pot dish packed with protein (toor dal), nutrients (veggies) and carbohydrate (rice) + mighty comforting! Eaten hot with crisp tangy boondi* and raita or pachhadi*. I turned to this simple yet filling combo for dinner when we had friends over the other day. Teamed with crisp masala vades*, cucumber pachhadi, some cooling yogurt rice and (very) sweet semiya payasam*, it made for a satisfying menu, or so our guests implied :)

I'm posting the recipes for bisibelebath and cucumber pachhadi -

Bisibelebath -
  • 1 cup rice (washed and drained)
  • 1/2 cup toor dal (washed and drained)
  • 2 cups mixed veggies - cubed - I had carrot, potato, green beans, peas and avarekalu (hyacinth beans)
  • 2-3 tbspns bisibelebath powder (store bought or made from scratch) - I used MTR ready powder
  • 1 tspn tamarind paste
  • 1/2 tspn jaggery - crushed (molasses)
  • salt to taste
For tempering -
  • 1 tbspn ghee (clarified butter) or oil
  • 1/4 tspn mustard seeds
  • a pinch of hing (asafotieda)
  • a handful of curry leaves
  • a handful of peanuts
  • a pinch of turmeric
Method -

You could quite easily follow the recipe on the MTR packet. Nevertheless -
  • Cook rice and dal together. (I used a pressure cooker)
  • Cook veggies separately (I cooked them in the microwave)
  • Combine cooked rice+dal and veggies in a big sauce pot. Add enough water to bring to a semi solid consistency, like that of a thick porridge.
  • Add all other ingredients, one by one and mix well. Bring to a light simmer.
  • Heat ghee/oil in a small pan and all ingredients for tempering.
  • Pour over the simmering bisibelebath and mix well.
  • Serve hot with a dollop of ghee, boondi or potato chips and pachhadi.
Note: This dish tends to solidify and turn lumpy when left to cool. Before serving, add a wee bit of warm water and reheat, making sure the consistency is that of a thick porridge.

Cucumber Pachhadi -
  • 2 medium cucumbers - finely chopped or grated
  • 2-3 cups yogurt or buttermilk
  • salt to taste
grind to a paste-
  • 1/4 cup grated coconut
  • 1/4 tspn jeera (whole cumin)
  • 2-3 green chillies
  • 2 tbspns fresh coriander - chopped
tempering -
  • 1 tspn oil
  • 1-2 dry red chillies, roughly broken into chunks
  • 1/4 tspn mustard seeds
  • a pinch of hing (asafotieda)
  • a few curry leaves
Method -
  • Tip in finely chopped cucumber into a large bowl.
  • Combine coconut paste and yogurt and add to chopped cucumber.
  • Add salt to taste and mix well. Adjust consistency by adding some water if the yogurt is thick. The consistency of pachhadi should be fairly loose.
  • Heat oil in a small pan and add all ingredients for tempering.
  • Pour tempering over the pachhadi and mix well.
Bisibelebath or BBB as some people fondly call it, is a signature dish from Karnataka. Try it and you're sure to enjoy its homely, wholesome taste :)

*boondi = a crisp tangy Indian savoury made from chickpea flour
*pachhadi = a yogurt based runny salad of sorts
*masala vades = crisp spicy lentil fritters (recipe here)
*semiya payasam = a sweet porridge made from milk, sugar and vermicelli

Thursday, August 12, 2010

Soulful Comfort Food

It was a cold, morbid afternoon. I wasn't in my happy place. Outside, the wind howled adding to my downcast mood. It seemed like the sun wasn't  very upbeat either 'cos he was hiding behind the dark, gloomy clouds. Nothing around me suggested cheer. Yet I had to eat...somehow I believed that I would feel better if I ate. I longed for my mom's tomato saaru and aloo fry, sigh! With that soothing picture in mind, I went about making lunch. Nothing fancy, just some really simple food. Some call it khichdi, some others may call it something else. But to me, it was a mood-lifter of sorts. 'Shhh' said the pressure cooker, three to four times and it was as if it was saying, 'hush now, everything's going to be alright'...My house smelt of jeera, ghee and hing...familiar smells of home. Now that's what I call soulful comfort food!

Recipe-
  • 1 cup rice (washed and drained)
  • 1/4 cup toor dal (washed and drained)
  • 2 tbspns ghee
  • 1 tspn whole cumin (jeera)
  • 1/4 tspn hing (asafotieda)
  • 2-3 fresh green chillies, slit
  • a handful of curry leaves
  • a couple of cloves of garlic, crushed
  • 1/2 tspn ground turmeric
  • a few peppercorns
  • 1 medium potato, cubed
  • 1 cup avarekai - now I don't know what this is called in English. I used the frozen ones and on the packet it said Lima Beans & Tuvar Lilva (see picture)
  • 1 small onion, chopped
  • whole garam masala - cinnamon, cloves, bay leaf and cardamom pods (optional)
  • salt to taste
Method -
  • Heat ghee in a pressure cooker and add whole cumin, hing, pepper corns, curry leaves, green chillies, garlic and turmeric, one after the other. (If you're including whole garam masala, add at this stage.) Your kitchen should smell really good right now :)
  • Toss in chopped onion and saute for a bit.
  • Now add in rice and dal and mix well. This mixture needs to kind of fry for a couple of minutes. Give it some time until the rice turns opaque. But make sure the flame is sort of medium low as we don't want anything to burn. This is kind of an important step if you don't want everything to turn into a mush in the end.
  • Next, in go the cubed potatoes and avarekai.
  • A quick mix and it's time to add water. Now normally, we'd follow the 1:2 ratio for rice. But this needs to have a porridge like consistency. So go ahead and add about two or three cups more than you normally would. For this recipe, add about six cups of water.
  • Sprinkle salt for taste and give everything a good stir.
  • With the cooker weight on, let this cook for about three to four whistles.
  • Serve hot with pickle, more ghee and papadums.
If you don't have a pressure cooker, you could probably make it in a biggish pot with a lid or you could use the microwave. Cooking times may vary.

LinkWithin

Blog Widget by LinkWithin